
I wrote this tutorial on November 8th 2009 for deceptions82.blogspot.com
Any resemblance to any other tutorial is purely coincidental.
Supplies Needed
I used Paintshop Pro, version 10.
I also used Alien Skin Eye Candy 5 – Impact.
And for animating I used Animation Shop 3.
A working knowledge of PSP is also needed.
Scrapkit. I used “Snow Family” by Country Hollow Creations.
You can purchase the tagger size kit - http://www.countryhollowscraps.com
Tube of Choice. I used a lovely tube called “Merry Christmas” from the artwork of Sandra Pascuini. Her artwork can be found - http://sandrapascuini.deviantart.com
Template. I used #36 by Yvette at Essence of Creativity. You can find this template and others on her blog - http://essenceofcreativity1.blogspot.com
Font. I used A&S Blaze Font. You can find it more fonts - http://www.azfonts.net
Get comfy in your chair &let's get to tagging :)
Open your template.
Save a copy of your template.
Delete the top layer.
From your Scrapkit open red foil paper.
In your template click on large frame layer.
Using your magic wand go to select all, float, and then de-float. Paste your red foil paper into the selection & then select none.
Now click on the small frames layer.
Using your magic wand go to select all, float, and then de-float. Paste your red foil paper into the selection &; then select none.
From your Scrapkit open green foil paper.
In your template click on large rectangle layer.
Using your magic wand go to select all, float, and then de-float. Paste your green foil paper into the selection & then select none.
From your Scrapkit open green glitter paper.
In your template click on thin rectangle layer.
Using your magic wand go to select all, float, and then de-float. Paste your green glitter paper into the selection & then select none.
Now may be a good time to save your work!
From your Scrapkit open red glitter paper.
In your template click on small squares layer.
Using your magic wand go to select all, float, and then de-float. Paste your red glitter paper into the selection & then select none.
Now click on the large square layer.
Using your magic wand go to select all, float, and then de-float. Paste your red glitter paper into the selection & then select none.
From your Scrapkit open 3 tubes of your choosing. I chose snowboy, snowbaby, and snowfamily for mine.
You'll need to resize each of these tubes by 20%
In your template click on small squares layer.
Paste as new layer each of your 3 tubes chosen from the Scrapkit. Arrange them to your liking.
If any part of the snowmen (or your tubes chosen from the Scrapkit) show around the outside of the smaller frames you'll need to use your erase tool and erase this portion. I used the square shape & made sure it was 100 hardness & 100 opacity.
From your Scrapkit open 3 Christmas Bulbs of your choosing. I chose bulb 1, 2, & 3 for mine.
You'll need to resize bulb 1 by 12% and bulbs 2 & 3 by 16% in order to make them all the same size.
In your template click on circles layer.
Paste as new layer each of your 3 bulbs chosen from the Scrapkit. Arrange them to your liking.
Open your tube of choice.
In your template click on large square.
Paste your tube of choice & resize & arrange to your liking. I also added a drop shadow to my tube of choice with the settings of; vertical 2, horizontal 2, opacity 50, blur 5, and color of black. Then I used my erase tool and removed any parts of the tube that were showing outside of the large frame.
Add any extra tubes from the Scrapkit if you choose. I choose to add 2 copies of snowflake 2 (resizing it by 20%) and positioning it in between the large frame & small frames. I also chose to add the tree (resizing it 15%) and pasting it inside of the large frame. Then erasing any portion that shows outside of the frame.
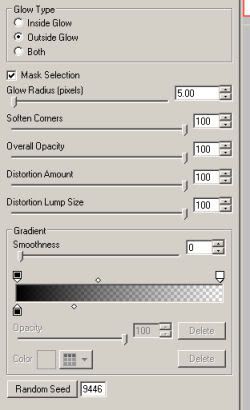
If you have Alien Skin Eye Candy 5 – Impact you can add a gradient glow to your large rectangle, thin rectangle, small frames, and large frame layers. My settings are pictured below.
In your template click on the top layer.
Using your text tool click anywhere on that layer to add your text.
Choose A&S Blaze as your font. Size 48. Bold. Alignment Center. Stroke Width 1.5. Create as Vector selected. Tracking set to -0.050. Foreground/Stroke properties set to a dark green color. Background/Fill properties set to gradient of multi-red, linear style, 0 angle, 0 repeats, Invert is unchecked. Type “Happy Holidays” in your Text Entry Box. Click Apply.
Position your “Happy Holidays” text wherever you'd like. I positioned mine centered above the large frame.
Select the Layer your Text is on. It should be called Vector. And right click and convert it to raster layer so we can add some effects!
If you have the plug-in add a gradient glow to your “Happy Holidays” text using the same settings as before.
If you do not have this plug-in, you can simply add drop shadow to this text, as you did with your previous layers.
Using your text tool click to add your watermark & any copyright information needed.
Now you can merge all (flatten) before we add our name!
Using your text tool click anywhere to add your name.
I chose A&S Font again. Size 72. Bold. Alignment Center. Stroke Width 1.0. Create as Vector Selected. Tracking set to 0. Foreground/Stroke properties are set to dark green color. Background/Fill properties set to gradient of multi-red, linear style, 0 angle, 0 repeats, Invert is unchecked. And you type your name. Click Apply.
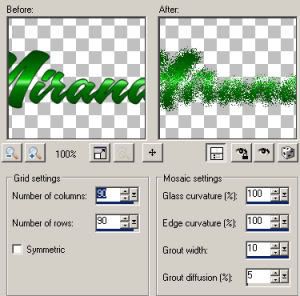
Position your name wherever you'd like. I positioned mine centered below the large frame. To add the effects I have you can convert your text to raster, duplicate the layer, and use Texture Effects, Mosaic Glass with the settings below.
Then on the top layer of my text I used the same gradient glow we used before.
If you do not want to animate – Merge all (flatten) and export as JPG image. And show off your completed tag! Feel free to let me know if you've used my tutorial and if you have any questions/complaints/suggestions!
If you want to animate using Animation Shop 3. Mark your Merged Layer as Invisible & then Merge visible. But do not flatten. Make your invisible layer visible, and make the layer with your name on it invisible. Also make the white background layer visible.
Go to edit, copy merged.
Open Animation Shop 3.
Paste as New Animation. Duplicate this so there are 20 frames.
Open the snow animation which you can download *here*
Right click frame one of your snow animation. Hold shift down and right click frame 20 so that all the frames are highlighted blue. Now CTRL-C or copy.
Click back to your animation 1 (your blank tag)
Right click frame one of your tag. Hold shift down and right click frame 20 so that all the frames are highlighted blue.
Click Edit, Paste into Selected Frame. And position your snow so that it appears to be inside the large frame.
You will repeat this step several times until the frame looks like it is full of the snow animation.
To preview your work click view & select preview.
You may want to save this animation. And feel free to close the snow animation.
Go back to Paintshop Pro and make the text with your name on it visible again.
Select Edit. Copy. Go back to Animation Shop 3.
Paste as New Animation. Duplicate this so there are 20 frames.
Right click frame one of your name. Hold shift down and right click frame 20 so that all the frames are highlighted blue.
Click back to your animation 1 (your newly saved tag with snow). And make sure that all frames are selected.
Click Edit, Paste into Selected Frame. And position your name wherever you think it looks best.
Preview your animation like we did before to make sure it looks okay.
Then save as, and enjoy your new animated tag!


No comments:
Post a Comment