Any resemblance to any other tutorial is purely coincidental.
Scrap kit - Christmas Traditions PTU Kit by C.C.Creationz @
http://cccreationz.blogspot.com
Available for purchase *
HERE* or *
HERE*
Template (MV_Template11) by MelissaVgraphics @
http://melissav-psp.blogspot.com
Font - Jessaine Script SSK -
Download Here
Tube - Christmas Star by Chatzoudis PTU @
http://www.mypsptubes.com
Open MV_Template 11
Save copy as - wherever you save your work as you're working on tags...
Delete credits layer
Open Paper 7. Copy.
Select "Frame" Layer.
Select All. Float. Defloat. Paste into Selection. Select None.
Open Paper 17. Copy.
Select "Center Rectangle" Layer.
Select All. Float. Defloat. Paste into Selection. Select None.
Select "Frame" Layer.
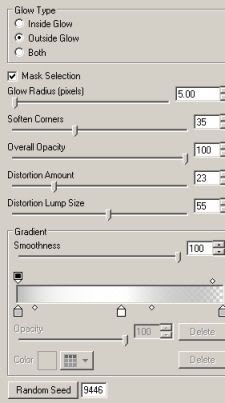
Effects. Plugins. Alien Skin Eye Candy 5 - Impact. Gradient Glow.
Settings Pictured Below.

If you do not have Eye Candy 5 - Impact you can substitute with your 3D Effects Drop Shadow Setting.
Set Blur to 0, Opacity to 100, Vertical and Horizontal to 4.
Then Redo with the same settings except change Vertical and Horizonal to -4 this time.
Open White Ornament. Copy. Paste as New Image. Close Original.
Resize by 20%. Copy. Paste into Template above "Circles" Layer. Place in desired location.
Go back to your Copy of White Ornament. Resize by 50%. Copy. Paste into Template. Duplicate. Arrange both in desired location.
Open Green Ornament. Copy. Paste as New Image. Close Original.
Resize by 16%. Copy. Paste into your Template. Duplicate. Arrange both in desired location.
Go back to your Copy of Green Ornament. Resize by 40%. Copy. Paste into Template. Duplicate 2 times. Arrange all 3 into desired location.
Open Red Ornament. Copy. Paste as New Image. Close Original.
Resize by 14%. Copy. Paste into your Template. Duplicate. Arrange both in desired location.
Go back to your Copy of Red Ornament. Resize by 70%. Copy. Paste into Template. Arrange in desired location.
Go back to your Copy of Red Ornament. Resize by 50%. Copy. Paste into Template. Duplicate 2 times. Arrange all 3 into desired location.
Select the "Circles" Layer. Delete it.
Make all the layers except for the ones with ornaments on them, invisible (so you cannot see them).
Go to one of the layers with ornaments on them and "merge visible".
Select the layer with your ornaments and add a drop shadow. I used the settings of Vertical and Horizontal at 2. Opacity at 50. Blur at 5. And the color black.
Open Paper 9.
Select the "strip 1" layer. Select all. Float. Defloat.
Using Flood Fill Tool. Choose Paper 9 as your Foreground and Stroke Properties Pattern at a scale of 50%. Fill in the Selection. Select None.
Open Paper 19.
Select the "strip 2" layer. Select all. Float. Defloat.
Using Flood Fill Tool. Choose Paper 19 as your Foreground and Stroke Properties Pattern with same settings as before. Fill in Selection. Select None.
Open Paper 4.
Select the "strip 3" layer. Select all. Float. Defloat.
Using Flood Fill. Choose Paper 4 as your Foreground and Stroke Properties Pattern with same settings as before. Fill in Selection. Select None.
Select "strip 1" Layer.
Effects. Plugins. Alien Skin Eye Candy 5 - Impact. Gradient Glow.
Same settings as before.
Repeat for "strip 2" layer and "strip 3" layer.
Again if you don't have Eye Candy 5 Impact you can substitute with the drop shadow, using the same settings as before.
Open Garland. Copy. Paste as New Image. Close Original.
Resize Garland by 50%. Copy. Paste into Template. Duplicate 3 times.
Place one Garland along the left side of the inside of the frame. Place one Garland along the right side of the inside of the frame.
Rotate the remaining Garland so it's laying horizontal. Duplicate.
Place one of these Garland along the top inside of the frame. Place the other Garland along the bottom inside of the frame.
Make all the layers except for the ones with garland on them, invisible (so you cannot see them).
Go to one of the layers with garland on them and "merge visible".
Select the layer with your garland and add a drop shadow. I used the settings of Vertical and Horizontal at 2. Opacity at 50. Blur at 5. And the color black.
Open your tube of choice. Copy. Paste into Template below the garland layers. Increase so the tube of choice fills half of the frame. Change opacity of this layer to about 55.
Go back to your tube of choice. Copy. Paste into Template above all the layers. Arrange tube in desired location.
Add credits & copyright information as needed. Merge layers.
Add your name. I used Jessamine Script SSK font. Paper17 for the Foreground and Stroke Properties. White for the Background and Fill Properties.
Arrange to your liking. Export as jpg. Enjoy :o)